
Creating Cold Process Soap
- Violet Grant
- Aug 1, 2022
- 4 min read
Updated: Dec 26, 2022
Creating soap using the cold process method can be quite satisfying and very addictive. The cold process method is ideal for preserving the benefits of plant-derived oils and butters and can be customized down to the last ingredient!

Step by Step Cold Process Soap
Please read through the following prior to making your soap
SAFETY PRECAUTIONS
Lye or caustic soda is an alkaline chemical that can cause chemical burns to any exposed part of your skin. It is a dangerous and corrosive product and needs to be handled appropriately to reduce risk of injury. When the lye is added to water it generates dangerous vapors that must not be inhaled. Always prepare the solution in a well ventilated area (outside is best) and wear safety gear:
long sleeves
gloves (disposable are good)
eye protection safety goggles
mask

Your Recipe
If you are new to soap making there are a number of excellent soap makers on YouTube who are so gracious in giving excellent information, and many will also place their recipe for use.
Soapmakers I Recommend
Obviously there are so many more, but these are the most excellent and generous creators of cool soap (in my opinion)
If you need any assistance with creating your own great soap recipe, I would recommend going to a Lye or Soap calculator where you can add the ingredients (butters, oils etc.) that you would like to use in your recipe, and it will enable you to see your recipe properties as well as the weights needed to produce your soap. They each have a Recipe section.
Check out these Online Calcuators
LyeCalc (great for beginner)
Prepare the Lye Mixture
It is strongly advised NOT to use a glass container as the lye can etch glass over time causing it to crack or break. Heat resistant plastics, silicone or stainless steel are excellent options (not aluminium or other metals as they react with the lye)
Place your plastic container on the scales and zero out its weight
Add distilled or purified water according to your recipe amount (this is also the time to add citric acid (see post on Citric Acid and Soap) or sugar if part of your recipe - make sure to dissolve these prior to adding the lye)
Measure the recipe amount of lye into a small disposable container or cup
Gently pour the lye into the water (NEVER pour the water into the lye as it will volcano)
Stir until the lye is completely dissolved and set aside until the temperature is appropriate to mix with the oils
Weigh The Butters & Oils
Place a medium to large size container on the scales and zero out its weight
Measure the solid butters/oil each according to the recipe amount, zeroing the scales between each. I would recommend gently melting any solid butters/oil prior to adding the liquid oils - this can be done either on the stove top in a double boil method, or in the microwave. Don't overheat the oils.
Zero the scales and add the liquid oils to the melted butters/oil
Prepare The Additives
Preparation for each of the ingredients to be added should be done prior to proceeding with your mixing. This will allow a smoother process. Always zero the scales between each ingredient to be weighed.
Fragrance Oils
I would recommend resourcing your oils from a reputable business to enable the best quality. Here are some great Australian online suppliers of many of the oils and products you will need for your soap.
Fragrance oils and essential oils each have a recommended usage amount in cold process soap - you will need to research this amount for your particular fragrance or essential oil. The fragrance can be added after the soap batter is brought to a light trace. If you are splitting the batter for colouring, then you could add the fragrance to each jug of batter and stir in completely prior to pouring.
Zero the scales and in a small container, place the fragrance oil according to the required amount.
Other Additives
You can add almost anything to your soap mix by the tablespoon or gram. They should be added to the melted oils and mixed in thoroughly prior to adding the lye mix. These may include:
titanium dioxide (for whiter soap)
colloidal oats
clays
milk powders (goat, coconut)
natural plant colourants, mica, oxides, spices
Colourants

If you intend to colour your soap you should prepare the colours in separate containers big enough to take some of the soap batter. Apart from Titanium Dioxide (for whiter soap), a variety of coloured soap batter can be created after bringing the main soap batter to trace.
add the colours to separate containers
when the soap batter is at a light trace (below), separate the soap batter amount you prefer into each container
blend until well mixed (this may bring thicken the batter somewhat)
depending on the overall effect you are aiming to achieve, you can add each colour to the main soap batter for a swirl effect or add each colour separately to your mold
Making the Soap
Add The Lye Solution
Slowly add the lye-water mixture to oil mix. This will cause the oils to turn a little cloudy
Using a stick blender gently stir in small bursts until all the mix is well blended and the batter comes to a light trace (this is when the batter leaves a notable coating on the blender or a light impression in the batter)

Pouring the Soap
Pour the soap batter into your mold using a back and forth motion (this is the time to add your colours and artistic flair)
Gently tap the mold on a hard surface to remove any trapped pockets of air
Decorate the soap as desired using dried botanicals, pink salt chunks etc.
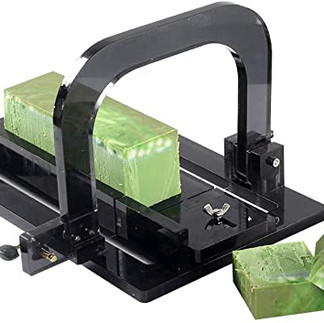
Cutting the Soap
Your soap will harden over a few hours and depending on your soap recipe and the amount of 'soft' oils used, it can take a minimum of 24 hours to harden enough to release from the mold without damaging your bar.
There are a number of soap cutting devices available online (click the image) that range in price, but if you don't have one of these simply use a large sharp knife.


wait for at least 24 hours for your soap to harden
measure the size of your bars
cut straight down with a non-serrated large knife without 'rocking' the knife

Comentários